
WebRTC 全平台编译指南,本文作者:Liam Keh,来自公众号 PixPark。
1. WebRTC版本
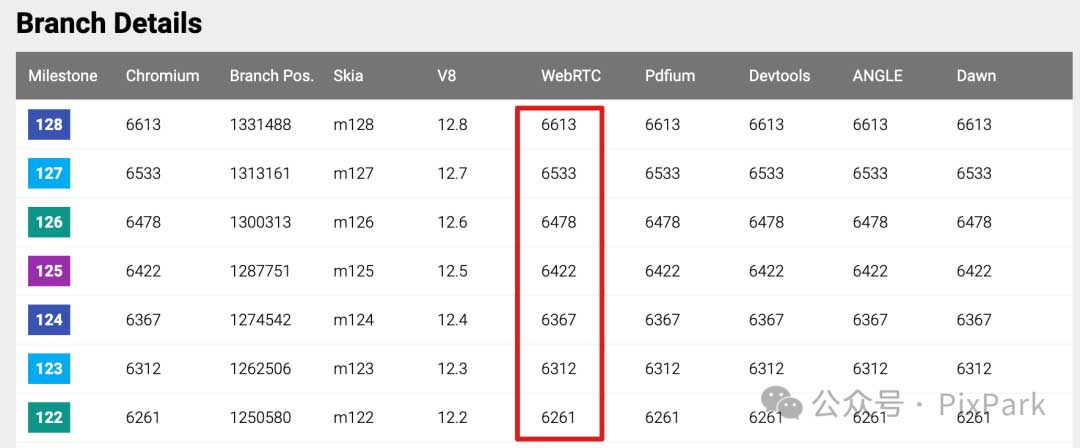
Webrtc版本和对应的 branch-heads 可以从 Chromiumdash 查看,最新已经到 M128(2024-8-1)
2. 代码下载
创建 webrtc 目录, 国内访问不了谷歌仓库,必须配置代理
2.1. 代理配置
在 webrtc 目录下创建 http_proxy.boto 代理配置文件
[Boto]
proxy=127.0.0.1
proxy_port=7890  # 端口根据自己配置的代理工具来
声明代理
export NO_AUTH_BOTO_CONFIG=~/webrtc/proxy.boto配置 git 代理
修改 ~/.gitconfig 文件,添加代理配置
[http]
    proxy = 127.0.0.1:7890
[https]
    proxy = 127.0.0.1:7890
配置终端代理
主要是给 curl 和 wget 还有一些Python脚本等工具使用
export https_proxy=http://127.0.0.1:7890 http_proxy=http://127.0.0.1:7890 all_proxy=socks5://127.02.2. depot_tools
克隆下这个仓库,并将 depot_tools 添加到环境变量中, gn, gclient, ninja 等命令都在这个仓库中
git clone https://chromium.googlesource.com/chromium/tools/depot_tools编辑 ~/.zshrc 或者 ~/.bashrc 文件,添加以下内容,路径更加自己的路径来配
# depot_tools
export PATH="/Users/admin/repos/tools/depot_tools:$PATH"
验证是否配置成功
source ~/.zshrc
which gclient
参考
• https://www.chromium.org/developers/how-tos/install-depot-tools/
2.3. iOS 和 MacOS
fetch --nohooks webrtc_ios
gclient sync --with_branch_heads
2.4. Android
在webrtc目录执行以下命令
fetch --nohooks webrtc_android
gclient sync --with_branch_heads
2.5. Windows
fetch --nohooks webrtc
gclient sync --with_branch_heads
2.6. 全平台
如果要一次拉取全平台代码,可以创建 .gclient 文件, 放入以下内容,target_os 指定所有fetch的系统平台
solutions = [
{
"name":"src",
"url":"https://webrtc.googlesource.com/src.git",
"deps_file":"DEPS",
"managed":False,
"custom_deps":{},
},
]
target_os =["ios","mac","android","win","unix"]
然后执行
gclient sync --with_branch_heads.gclient_entries 文件和src同级目录,自动生成的,包含了所有webrtc依赖仓库的信息
如果出现代码下载错误,检查代理配置,重新执行
gclient sync即可,直到 100% {: .prompt-info }
关于gclient
用于同步solution的各个仓库,它有一些参数:
• -f、--force: 强制更新未更改的模块;
• --with_branch_heads:除了clone默认refspecs外,还会clone “branch_heads” refspecs;
• --with_tags: 除了默认的refspec之外,还可以clone git tags;
• --no-history: 不拉取git提交历史信息;
• --revision <version> : 将代码切换到 version 版本;
• --nohooks :拉取代码之后不执行hooks
3. 分支切换
使用 gclient sync --with_branch_head同步完代码,可以看到下面的 brand heads
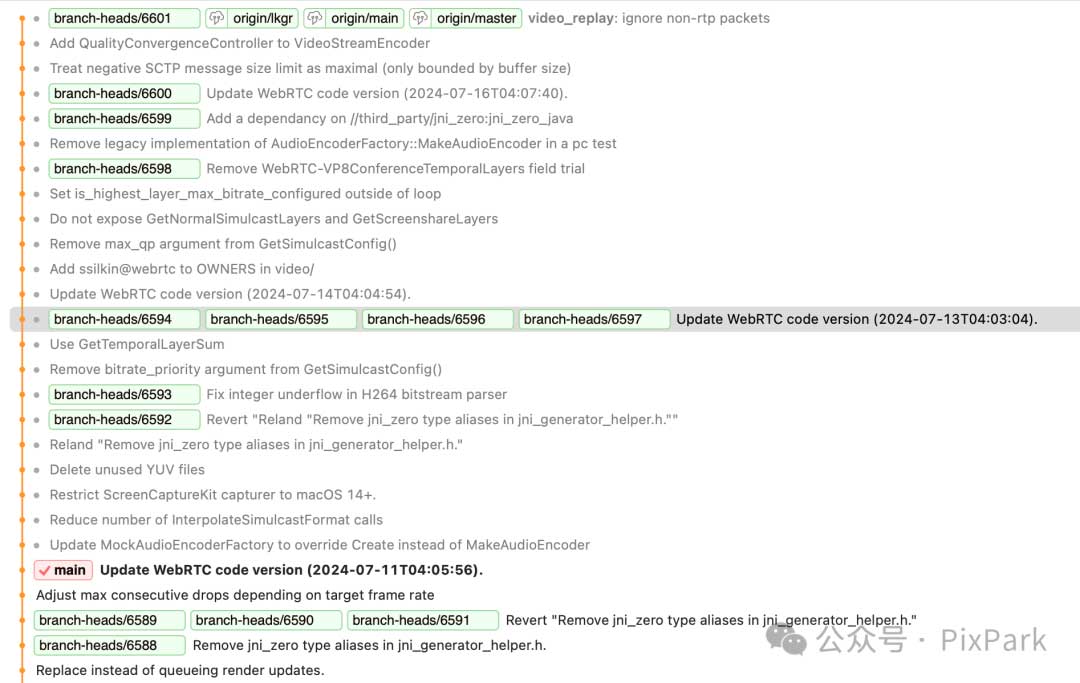
切换分支
# webrtc src 目录
cd src
# 创建m128对应的 branch-heads/6633 分支
git checkout -b M128/6613 branch-heads/6613

# 同步该节点依赖的三方库,必须要执行
gclient sync --nohooks
4. 代码编译
4.1. iOS
生成工程
# debug build for 64-bit iOS
gn gen out/ios_64 --args='target_os="ios" target_cpu="arm64" ios_enable_code_signing=false'

# debug build for simulator
gn gen out/ios_sim --args='target_os="ios" target_cpu="x64" ios_enable_code_signing=false'
编译
ninja -C out/ios_64 AppRTCMobile使用xcode编译
# 生成xcode工程
gn gen out/ios --args='target_os="ios" target_cpu="arm64" ios_enable_code_signing=false' --ide=xcode
# 打开xcode工程
open -a Xcode.app out/ios/all.xcworkspace
ios_enable_code_signing=false是为了解决生成工程签名报错问题,更多工程生成选项参考文章最后 {: .prompt-info }
4.2. MacOS
生成工程
Apple Silicon:
gn gen out/mac_debug --args='target_os="mac" target_cpu="arm64"' --ide=xcodeIntel Mac:
# xcode
gn gen out/mac_debug --args='target_os="mac" target_cpu="x64"' --ide=xcode
编译
ninja -C out/mac_debug AppRTCMobile
# 或
open -a Xcode.app out/mac_debug/all.xcworkspace
4.3. Android
安装依赖
如果是Ubuntu或 Debian 系统,需要安装依赖, 执行 webrtc/src/build 目录下的安装依赖脚本
./build/install-build-deps.sh生成工程
# arm
gn gen out/Debug --args='target_os="android" target_cpu="arm"'

# arm64
gn gen out/Debug --args='target_os="android" target_cpu="arm64"'

# x86
gn gen out/Debug --args='target_os="android" target_cpu="x86"'

# x64
gn gen out/Debug --args='target_os="android" target_cpu="x64"'
默认生成 debug 版本,release 版本,添加
is_debug=false参数,更多工程生成选项参考文章最后 {: .prompt-info }
生成Android Studio 工程(可选)
# Import the project in Android Studio. (Do not just open it.) The project is located in out/Debug/gradle.
build/android/gradle/generate_gradle.py --output-directory $PWD/out/Debug \
--target "//examples:AppRTCMobile" --use-gradle-process-resources \
--split-projects
编译
ninja -C out/DebugAndroid代码可以在MacOS上编译上下载, 但编译官方只支持 Ubuntu系统,如果需要MacOS编译,可以参考这里 {: .prompt-info }
4.4. Windows
生成工程
gn gen out/Debug --args="target_os=\"win\" target_cpu=\"x64\" is_component_build=false rtc_enable_protobuf=true rtc_use_h264=true rtc_initialize_ffmpeg=true ffmpeg_branding=\"Chrome\" rtc_include_tests=false " --ide=vs2015编译
ninja -C out/Debug
# 或使用vs打开工程编译
参考:Widows编译WebRTC
5. 编译参数
所有的编译参数可以通过命令查看,out/ios生成的工程路径
gn args out/ios --list以下是一些gn 生成工程时候常用到的参数,可以减小编译时间和裁剪库体积等
# 开启rtti, 默认开启
use_rtti=true
# 开启debug, 默认开启
is_debug=true
# 开启h264编码
is_component_build=false
rtc_use_h264=true
# 开启protobuf
rtc_enable_protobuf=true
# 是否编译测试代码,默认true
rtc_include_tests=false
# 是否编译示例代码,默认true
rtc_build_examples=false

proprietary_codecs=true

rtc_enable_sctp=false
# 禁用libevent
rtc_enable_libevent=false
# 指定ffmepg 版本
ffmpeg_branding="Chrome"
#
rtc_build_tools=false
# 禁用android lint
disable_android_lint=false
#禁用 webrtc自带的libc++库,防止和标准库冲突,如果编译动态库可以打开
use_custom_libcxx=false
#使用非 webrtc自带的libc++库,防止和标准库冲突
use_custom_libcxx_for_host=true
# 仅针对安卓
android32_ndk_api_level=18
# 仅针对iOS和Mac,启用签名
ios_enable_code_signing=false
# 编译警告当错误处理
treat_warnings_as_errors=true
# 开启libaom,AV1编码
enable_libaom=true
# 开启libvpx,VP9编码
rtc_libvpx_build_vp9=false
# 生成DSYM文件, 防止Mac和iOS断点不停止问题
enable_dsyms=true
6. 参考
1. Android编译
2. iOS&MacOS编译
3. WebRTC Native Development
版权声明:本文内容转自互联网,本文观点仅代表作者本人。本站仅提供信息存储空间服务,所有权归原作者所有。如发现本站有涉嫌抄袭侵权/违法违规的内容, 请发送邮件至1393616908@qq.com 举报,一经查实,本站将立刻删除。
