
本文将使用 Angular 前端和 NodeJS 后端创建一个实时聊天应用程序。逐步帮助您从零开始创建一个功能强大的聊天应用程序。
前提条件
开始之前,请确保您已安装以下工具:
Node.js
Angular CLI
步骤 1:设置后端
首先,使用 Express 和 Socket.IO 设置后端服务器。
1. 初始化项目
运行以下命令为项目创建新目录并安装必要的依赖项:
mkdir websocket-chat-demo
cd websocket-chat-demo
npm init -y
npm install express socket.io
2. 创建服务器
用以下代码段创建名为 server.js 的文件:
初始化服务器:设置 Express 和 Socket.IO,使用 socketIo(server, { cors: { origin: “http://localhost:4200” }) ,为客户端连接提供 CORS 支持。
- 处理用户加入: 使用
socket.on('join', (username) => { … })将新用户添加到列表中,并向所有客户端广播更新。
- 广播消息:使用
socket.on('chat message', (msg) => { … })来接收并向所有连接的客户端发送聊天信息。
- 管理断开连接:使用
socket.on('disconnect', () => { … })更新用户列表,并在有人断开连接时通知客户端。
- 启动服务器:使用
server.listen(PORT, () => { … })监听指定端口并记录确认信息。
const express = require ( 'express' );
const http = require ( 'http' );
const socketIo = require ( 'socket.io' );
const cors = require ( 'cors' );
const path = require ( 'path' );
const app = express();
const server = http.createServer(app);
const io = socketIo(server, {
cors: {
origin: "<http://localhost:4200>",
methods: ["GET", "POST"]
}
});
const PORT = 3000;
app.use(cors());
app.use(express.static(path.join(__dirname, 'dist/chat-app')));
const users = new Set();
io.on('connection', (socket) => {
socket.on('join', (username) => {
if (username) {
socket.username = username;
users.add(username);
io.emit('user list', Array.from(users));
}
});
socket.on('chat message', (msg) => {
io.emit('chat message', { username: socket.username, message: msg });
});
socket.on('disconnect', () => {
if (socket.username) {
users.delete(socket.username);
io.emit('user list', Array.from(users));
}
});
});
server.listen(PORT, () => {
console.log(`Server running on port ${PORT}`);
});该脚本设置了基本的 Express 服务器,并配置了用于实时通信的 Socket.IO。
步骤 2:设置 Angular 前端
1. 创建新的 Angular 项目
运行以下命令创建新的 Angular 项目并添加 Angular Material:
ng new chat-app
cd chat-app
ng add @angular/material
npm install socket.io-client
2. 创建 Angular 组件
编辑 app.component.ts,处理 WebSocket 通信:
io('http://localhost:3000'):建立与 Socket.IO 服务器的连接。this.socket.on('chat message', (msg) => { … }):监听传入的聊天信息,并用新消息更新聊天界面。this.socket.on('user list', (userList) => { … }):接收并更新已连接用户的列表。this.socket.emit('join', this.username):当有用户加入聊天时,向服务器发送带有用户名的加入事件。this.socket.emit('chat message', this.message): 向服务器发送包含消息内容的聊天消息事件,以便向其他客户端广播。
import { Component, OnInit } from '@angular/core';
import { io } from 'socket.io-client';

@Component({
  selector: 'app-root',
  templateUrl: './app.component.html',
  styleUrls: ['./app.component.scss']
})
export class AppComponent implements OnInit {
  socket: any;
  username = '';
  message = '';
  messages: { username: string, message: string }[] = [];
  users: string[] = [];
  typingUsers: Set<string> = new Set();
  joined = false;

  ngOnInit() {
    this.socket = io('http://localhost:3000');

    this.socket.on('chat message', (msg: { username: string, message: string }) => {
      this.messages.push(msg);
    });

    this.socket.on('user joined', (username: string) => {
      this.messages.push({ username: 'System', message: `${username} has joined the chat` });
    });

    this.socket.on('user left', (username: string) => {
      this.messages.push({ username: 'System', message: `${username} has left the chat` });
    });

    this.socket.on('user list', (userList: string[]) => {
      this.users = userList;
    });

    this.socket.on('typing', (username: string) => {
      this.typingUsers.add(username);
    });

    this.socket.on('stop typing', (username: string) => {
      this.typingUsers.delete(username);
    });
  }

  join() {
    if (this.username.trim()) {
      this.socket.emit('join', this.username);
      this.joined = true;
    }
  }

  sendMessage() {
    if (this.message.trim()) {
      this.socket.emit('chat message', this.message);
      this.message = '';
      this.socket.emit('stop typing');
    }
  }

  onTyping() {
    this.socket.emit('typing');
  }

  onStopTyping() {
    this.socket.emit('stop typing');
  }
}
3. 创建 HTML 模板
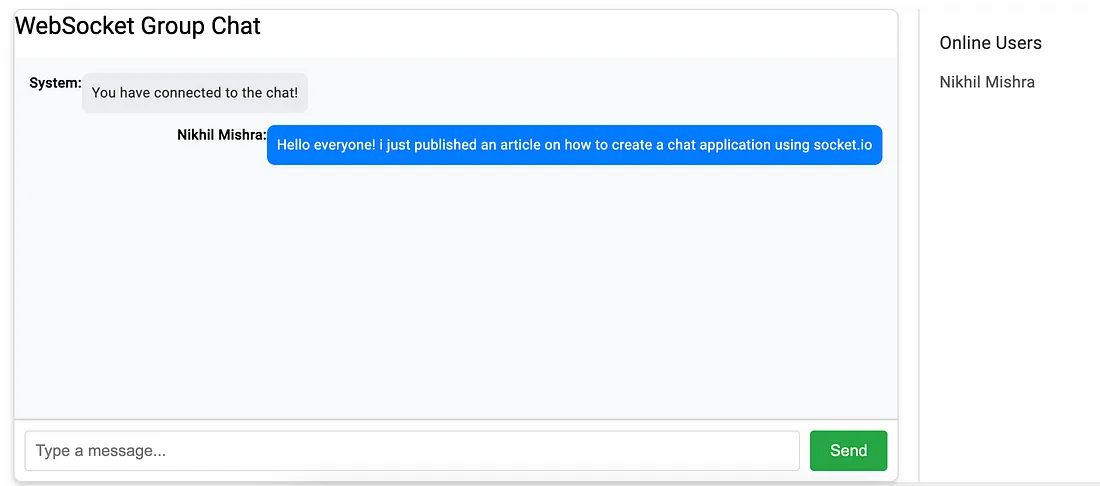
更新app.component.html以包含聊天界面:
<div class="chat-container">
  <div class="chat-box">
    <h1>WebSocket Group Chat</h1>
    <div *ngIf="!joined" class="join-container">
      <input [(ngModel)]="username" placeholder="Enter your username" />
      <button (click)="join()">Join Chat</button>
    </div>
    <div *ngIf="joined" class="messages">
      <div *ngFor="let msg of messages"
        [ngClass]="{'my-message': msg.username === username, 'other-message': msg.username !== username}"
        class="message">
        <strong>{{ msg.username }}:</strong>
        <div class="content">{{ msg.message }}</div>
      </div>
      <div *ngIf="typingUsers.size > 0" class="typing-indicator">
        <p *ngFor="let user of typingUsers">{{ user }} is typing...</p>
      </div>
    </div>
    <div *ngIf="joined" class="input-area">
      <input [(ngModel)]="message" (keyup.enter)="sendMessage()" (input)="onTyping()" (blur)="onStopTyping()"
        placeholder="Type a message..." />
      <button (click)="sendMessage()">Send</button>
    </div>
  </div>

  <aside class="user-list">
    <h3>Online Users</h3>
    <ul>
      <li *ngFor="let user of users">{{ user }}</li>
    </ul>
  </aside>

</div>
5. 为聊天应用设计样式
添加样式app.component.scss
通过以上步骤即可构建您自己的实时应用程序了。
版权声明:本文内容转自互联网,本文观点仅代表作者本人。本站仅提供信息存储空间服务,所有权归原作者所有。如发现本站有涉嫌抄袭侵权/违法违规的内容, 请发送邮件至1393616908@qq.com 举报,一经查实,本站将立刻删除。
